Below are the three main strategies we use in the Cabot Options Institute Quantitative and Cabot Options Institute Earnings trading services. In this report I focus on timeframes (30-60 days until expiration) used in my Quantitative service. But it doesn’t matter. While I use a significantly shorter timeframe for the trades placed in the Earnings service, this report is about the mechanics of the strategies I use.
I’ve gone through numerous examples below to help you have a better understanding of the not only the strategies I use, but the high-probability approach that is unique to both services. Statistics, probabilities, the Law of Large Numbers, expected range, disciplined risk-management, among several other key factors define our high-probability approach. And as always, as you read through the report, please do not hesitate to email me with any questions.
Bear Call Spreads
A bear call spread, otherwise known as a short call vertical spread, is one of my favorite risk-defined options strategies.
As the name of the strategy implies, a bear call spread is a bearish-leaning strategy.
But it is important to note that the strategy doesn’t require the security to move lower to make money. Unlike the binary nature of stock strategies, a stock can either go up or down with a bear call spread. So, you not only have the ability to make a return when a security moves lower, you can also make money if the stock stays flat or pushes slightly higher.
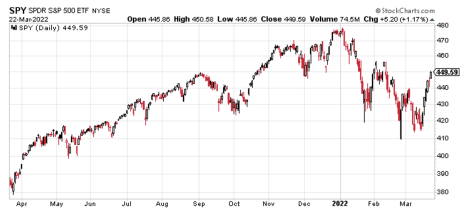
For example, with SPY trading for 449.59 I want to place a bear call spread with a high probability of success.
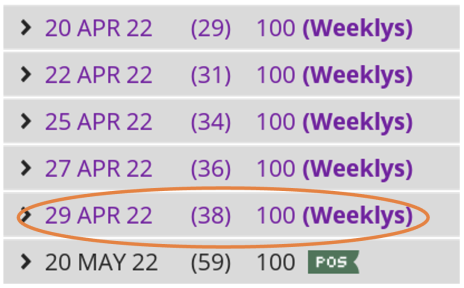
Let’s take a look at the options chain for SPY going out 28-65 days until expiration.
It looks like the April 29, 2022, expiration cycle with 38 days left until expiration falls within the 28-65 day range. As a result, let’s take a look at the call strike with an 80% probability OTM (out-of-the-money), otherwise known as the probability of success on the trade.
It looks like the 469 call strike with an 81.53% probability of success is where I want to start. The short call strike defines my probability of success on the trade. It also helps to define my overall premium or return on the trade.
Once I’ve chosen my short call strike, in this case the 469 call, I then proceed to look at a 3- strike wide, 4-strike wide and 5-strike wide spread to buy.
The spread width of our bear call helps to define our risk on the trade. The smaller the width of the spread the less capital required. When defining your position size knowing the overall defined risk per trade is essential. Basically, my spread width and my premium increase as my chosen spread width increases.
For example, let’s take a look at the 5-strike wide, 469/474 bear call spread.
The Trade: 469/474 Bear Call Spread
Simultaneously:
Sell to open SPY April 29, 2022, 469 strike
Buy to open SPY April 29, 2022, 474 strike for a total net credit of roughly $0.95 or $95 per bear call spread
- Probability of Success: 81.53%
- Total net credit: $0.95, or $95 per bear call spread
- Total risk per spread: $4.05, or $405 per bear call spread
- Max Potential Return: 23.5%
As long as SPY stays below our 469 strike at expiration in 31 days, I have the potential to make 23.5% on the trade.
In most cases, I will make slightly less, as the prudent move is to buy back the bear call spread prior to expiration. Typically, I look to buy back the spread when I can lock in 50% to 75% of the original credit. Since we sold the spread for $0.95, I want to buy it back when the price of my spread hits roughly $0.40 to $0.20. Of course, there are a variety of factors to consider with each trade. And we allow the probabilities and time to expiration to lead the way for our decisions. But, taking off risk by locking in profits is never a bad decision and by doing so, we have the ability to take advantage of other opportunities the market has to offer.
Risk Management
Since we know how much we stand to make and lose prior to order entry we have the ability to precisely define our position size on every trade we place. Position size is the most important factor when managing risk, so by keeping each trade at a reasonable level (I use 1% to 5% per trade) allows not only the Law of Large Numbers to work in your favor…it also allows you to sleep well at night.
I also tend to set a stop-loss that sits 2 to 3 times my original credit. In my example, I sold the 469/474 bear call spread for $0.95. As a result, if my spread reaches $1.90 to $2.85 I will exit the trade.
Bull Put Spread
A bull put spread, otherwise known as short put vertical spread, is one of my favorite risk-defined options strategies.
As the name of the strategy implies, a bull put spread is, well, a bullish-leaning strategy.
But it is important to note that the strategy doesn’t require the security to move higher to make money. With bull put spreads you not only have the ability to make a return when a security moves higher, you can also make money if the stock stays flat or even if the stock pushes slightly lower.
The first step in placing a bull put spread, or any trade, is making sure the security we are interested in is highly liquid. We always want to use the most efficient products possible. It just doesn’t make sense to have to make 5% to 15%, possibly more, to get back to breakeven.
iShares Trust Russell 2000 ETF (IWM)
IWM is a highly liquid product, as a result, we can move forward with a potential bull put trade.
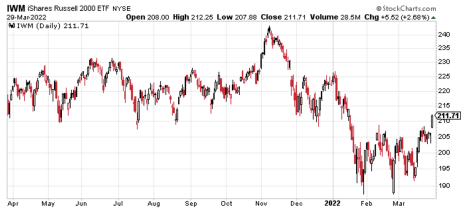
With IWM trading for 211.71 and near all-time highs I want to place a bull put spread with a high probability of success.
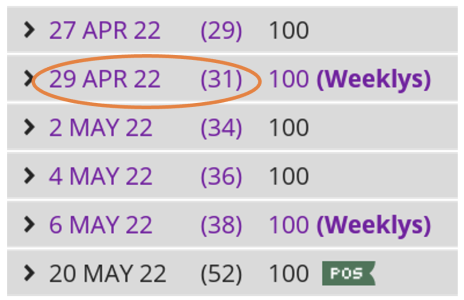
Let’s take a look at the options chain for IWM going out 28-65 days until expiration.
It looks like the April 29, 2022, expiration cycle with 31 days left until expiration fits the bill. As a result, let’s take a look at the put strike with approximately an 80% probability OTM (out-of-the-money), otherwise known as the probability of success on the trade.
It looks like the 197 put strike with an 80.31% probability of success is where I want to start. The short put strike defines my probability of success on the trade. It also helps to define my overall premium or return on the trade.
Once I’ve chosen my short put strike, in this case the 197 put I then proceed to look at a 3- strike wide, 4-strike wide and 5-strike wide bull put spread to buy.
The spread width of our bull put helps to define our risk on the trade. The smaller the width of the spread the less capital required. When defining your position size knowing the overall defined risk per trade is essential. Basically, my spread width and my premium increase as my chosen spread width increases.
For example, let’s take a look at the 4-strike, 197/193 bull put spread.
The Trade: IWM 197/193 Bull Put Spread
Simultaneously:
Sell to open IWM April 29, 2022, 197 strike
Buy to open IWM April 29, 2022, 193 strike for a total net credit of roughly $0.46 or $46 per bear call spread
- Probability of Success: 80.31%
- Total net credit: $0.46, or $46 per bull put spread
- Total risk per spread: $3.54, or $354 per bull put spread
- Max Potential Return: 13.0%
As long as IWM stays above our 197 strike at expiration in 31 days, I have the potential to make 13.0% on the trade.
In most cases, I will make slightly less, as the prudent move (and all research backs this up) is to buy back the bull put spread prior to expiration. Typically, I look to buy back the spread when I can lock in 50% to 75% of the original credit. Since we sold the spread for $0.46, I want to buy it back when the price of my spread hits roughly $0.23 to $0.12.
Of course, there are a variety of factors to consider with each trade. And we allow the probabilities and time to expiration to lead the way for our decisions. But, taking off risk by locking in profits is never a bad decision and by doing so, we have the ability to take advantage of other opportunities the market has to offer.
Risk Management
Since we know how much we stand to make and lose prior to order entry we have the ability to precisely define our position size on every trade we place. Position size is the most important factor when managing risk, so by keeping each trade at a reasonable level (I use 1% to 5% per trade) allows not only the Law of Large Numbers to work in your favor…it also allows you to sleep well at night.
I also tend to set a stop-loss that sits 2 to 3 times my original credit. In my example, I sold the 197/193 bear call spread for $0.46. As a result, if my spread reaches $0.92 to $1.38 I will exit the trade.
Iron Condor
One of my favorite risk-defined, non-directional options strategies is known as the iron condor.
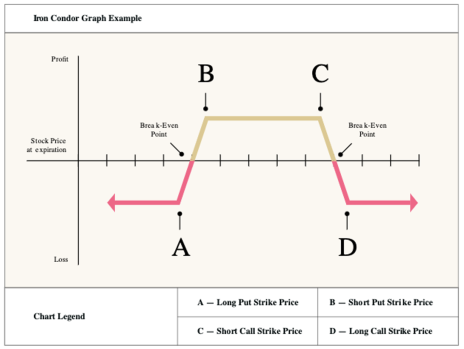
Yep, weird name, I know. But the name makes perfect sense when you look at the profit/loss chart for the strategy.
An iron condor is not only one of the most powerful options strategies, it’s also one of the best all-around investments strategies that we, as investors, have at our disposal.
The strategy consists of a short call vertical spread (bear call spread) and short put vertical spread (bull put spread).
If all the aforementioned seems like a foreign language, no worries. This is a strategy I want all investors to learn, so I’m going to go through the strategy and my approach in a step-by-step process.
Step One – Liquidity
Liquidity is king. The first step when trading iron condors, or any options strategy for that matter, is to make sure you are choosing a highly liquid stock or ETF. Some of the best ways to find out if an underlying security is liquid is to take a look at the open interest, volume and bid-ask spread for the at-the-money options.
I have created a list of highly liquid stocks and ETFs that I like to trade, and I rarely stray from that list. Why would I want to trade an underlying security that requires me to make back 5% to 15% on average just to get back to breakeven? It doesn’t make sense. Remember, we want to use efficient products that allow us to get in and out of the trade with ease. Don’t overlook the importance of using highly liquid securities.
Step Two – Expected Move
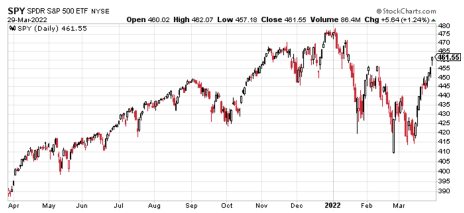
Let’s say we decide to place a trade in the highly liquid SPDR S&P 500 (SPY) going out roughly 30 days until expiration.
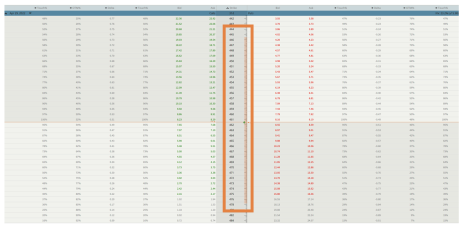
As you can see below, the expected move, also known as the expected range, is from 445 to 478.
In most cases, my goal is to place my iron condor outside of the expected move. Moreover, I prefer to have my probability OTM or probability of success around 75%, if not higher, on both the call and put side.
Step Three – Choosing Expiration Cycle and Strike Prices
Since I know the expected range, as seen above, for the S&P 500 (SPY) for the April 29, 2022, expiration cycle is from 445 to 478, I can then begin the process of choosing my strike prices.
Call side of the iron condor:
The high side of the expected range is again 478 for the April 29, 2022, expiration cycle, so I want to sell the short call strike just above the 478 strike, possibly higher.
As you can see above, the 480 call strike with an 86.92% probability of success fits the bill.
Once I’ve chosen my short call strike, I then begin the process of choosing my long call strike. Remember, buying the long strike defines my risk on the upside of my iron condor. For this example, I am going with a 4-strike wide iron condor, so I’m going to buy the 484 strike.
As a result, I am going to sell the 480/484 bear call spread for roughly $0.46. But, before I place the trade I want to choose the bull put portion of my iron condor.
Put side of the iron condor:
The low side of the range is, again, 445 for the April 29, 2022, expiration cycle, so I want to sell my short put strike just below the 445 strike, possibly lower.
As you can see above, the 431 strike with an 84.10% probability of success fits the bill.
Once I’ve chosen my short put strike, I then begin the process of choosing my long put strike. Remember, the long put strike defines my risk on the downside. For this example, I am going with a 4-strike wide iron condor, so I’m going to buy the 427 strike.
Again, it’s all about the probabilities when using options selling strategies. The higher the probability of success, the less premium you should expect to bring in. But as long as I can bring in a reasonable amount of premium, I always side with the higher probability of success, as opposed to taking on more risk for a greater return.
So, with a range of $49 (480 - 431) and SPY trading for roughly 461.55, the underlying ETF can move higher 4.0% or lower 6.6% over the next 31 days before the trade is in jeopardy of taking a loss.
Here is the theoretical trade:
Simultaneously…
- Sell to open SPY April 29, 2022 480 calls
- Buy to open SPY April 29, 2022 484 calls
- Sell to open SPY April 29, 2022 431 puts
- Buy to open SPY April 29, 2022 427 puts
We can sell this iron condor for roughly $0.80. This means our max potential profit sits at approximately 25.0%.
Again, I wanted to choose an iron condor that was outside of the expected move and has a high probability of success. This is why I sold the 480 calls and the 431 puts.
Remember, when approaching the market from a purely quantitative approach, it’s all about the probabilities. The higher the probability of success on the trade, the less premium I’m able to bring in, but again, the tradeoff is a higher win rate. And when I couple a consistent and disciplined high-probability approach on each and every trade I place, I allow the Law of Large Numbers to take over. Ultimately, that is the true path to success.
Step Four – Managing the Trade
I typically close out my trade for a profit when I can lock in 50% to 75% of the original premium sold. So, if I sold an iron condor for $0.80, I would look to buy it back when the iron condor reaches $0.40 to $0.20. This way I’m pocketing $0.40 to $0.60 on the trade.
If the underlying moves against my position, I typically adjust the untested side. Most roll the tested side, but all research states that rolling the untested side higher/lower allows me to bring in more premium and thereby decreasing my overall risk on the trade. Moreover, I look to get out of the trade when it reaches 1 to 2 times my original premium. So, in our case when the iron condor hits $1.60 to $2.40.
Ultimately, position size is the best way to truly manage an iron condor. We know prior to placing a trade what we stand to make and lose on the trade, therefore we can adjust our position size to fit our own personal guidelines. Iron condors are risk-defined, so it’s important to take advantage of their risk-defined nature by staying consistent with your position size for each and every trade you place. Remember, it’s all about the Law of Large Numbers.
Calculating an Iron Condor Max Loss and Max Profit
Let’s use SPY for our example.
As stated in our example above, the major-market ETF is currently trading for 461.55.
Call Side of the Iron Condor
We decided to go with a 4-strike-wide spread on both the call and put side of the trade.
Again, we chose the 480/484 bear call spread. Our credit on the call side of the iron condor was $0.46.
Put Side of the Iron Condor
Staying consistent with our spread width of $4, we chose the 431/427 bull put spread. Our credit for the spread was $0.34.
Our total credit for both spreads, as stated in our iron condor example above was $0.80 ($0.46 + $0.34). This is our max profit on the trade.
Once we have our total credit, in this case $0.80, we then take that amount and subtract it from our spread width of $4 to attain the iron condor max loss.
Max Loss: $4 – $0.80 = $3.20 per iron condor
Max Profit: $0.80
Knowing the max loss ahead of time gives us the ability to manage our risk through proper position size. For instance, if we typically allocate $2,500 per trade we know, through the calculations above, that we can trade seven iron condors to stay within our position-size parameters. Our total risk would be $2,240 ($320 x 7) for the trade.
Again, iron condors are risk-defined, so it’s important to take advantage of their risk-defined nature by staying consistent with your position size for every trade you place. Knowing how to calculate an iron condor max loss is the first major step in understanding how much money you have at risk. And understanding your risk prior to placing a trade is one of the most important aspects of trading successfully over the long term.
Remember, I can’t say it enough, it’s all about the Law of Large Numbers.
